Creating and editing Casing Schemes
You can create a new casing scheme, or edit the details of an existing one, for a wellbore using the Casing Scheme form. To open this form, go to the Casings tab in the Well Table (Views > Well Table > Casings) and click on the Create Casing Scheme or Edit Casing Scheme button. You can also access the Casing Scheme form directly from the Well View. Right-click on the well schematic track of a wellbore and select Edit Casing Scheme from the context menu.
To visualize and edit an existing casing scheme in the Casings tab in the Well Table, you must first select a wellbore which has a casing scheme in the JewelExplorer. A new casing scheme, created using the Casing Scheme form, is automatically displayed in the Well Table.
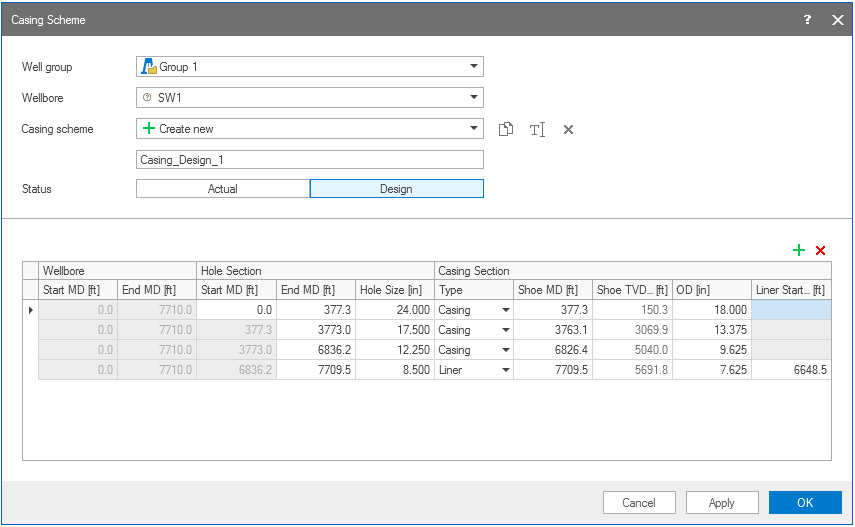
An example of a new casing scheme using the Casing Scheme form. click to enlarge
Creating a new casing scheme
- Click on the Create Casing Scheme button in the Casings tab in the Well Table.
- Select a Well group from the drop-down list. This can either be the group 'All Wells', which contains all the wellbores, or a user-defined group of selected wells.
- Select a Wellbore from the drop-down list. The list shows the wellbores present in the well group you selected in the previous step.
- After selecting a wellbore, the Casing scheme option is by default set to Create new. Enter a name in the field below.
- Define the Status of the new casing scheme. A casing scheme set to Design represents the state before drilling. For a drilled well, the casing scheme can be set to Actual. You can create multiple casing schemes as 'Designs' (for different possible scenarios). However, a wellbore can only have one 'Actual' casing scheme, which represents the actual drilled well.
- In the table, at the bottom half of the form, you specify values for the parameters of the new casing scheme. The first entry is created automatically after the Wellbore selection. The table contains sections with cells in which you can enter a value for each parameter.
- Liner Enter values for the Shoe MD, the Outer Diameter (OD) and the Liner Start MD.
- Casing Enter values for the Shoe MD and the OD.
- OpenHole You do not need to specify values for this casing type. The Openhole type must be the last entry in the scheme section.
- Click Apply at the base of the form to apply the settings and keep the form open, or click OK to apply the settings and close the form.
- After applying the settings, you can use the toolbar options at the right of the Casing scheme drop-down list to duplicate, rename or delete the created casing scheme.
Wellbore
Start MD The starting MD (Measured Depth) of the wellbore. It is for information purposes only.
End MD The end MD of the wellbore. It is for information purposes only.
Hole Section
Start MD Enter a value only for the first entry, as subsequent entries use the end depth of the previous row as starting point.
End MD Enter the values for the End MD.
Hole Size Enter the values for the Hole Size of a wellbore.
Casing Section
Type From the drop-down list select the type of casing you want for that entry. Based on the selected casing type you can edit specific fields in the table.
To add a new row click on the green plus icon  at the top right of the table. To delete a row, first select the row you want to delete and then click the delete icon
 ![]() .
.

|
Duplicates the currently selected casing scheme in the drop-down list. The duplicated casing scheme defaults to 'Design. |

|
Opens the Rename dialog, where a new name can be given to the active casing scheme. |
|
|
Deletes the active casing scheme. |
Editing a casing scheme
- In the Well Table (Views > Well Table > Casings), select the wellbore for which you want to modify the casing scheme and click on the Edit Casing Scheme button.
- You can use the options Duplicate, Rename or Delete, at the right of the Casing scheme drop-down list, to edit an existing casing scheme.
- You can change the Status of a casing scheme.
- In the table, at the lower half of the form, you can change the parameter values and the casing type. To add a new row click on the green plus icon at the top right of the table. To delete a row, first select the row you want to delete and then click the delete icon
 .
. -
Click Apply at the base of the form to apply the settings and keep the form open, or click OK to apply the settings and close the form.
|
|
Duplicates the currently selected casing scheme in the drop-down list. The duplicated casing scheme defaults to 'Design. |
|
|
Opens the Rename dialog, where a new name can be given to the active casing scheme. |
|
|
Deletes the active casing scheme. |
. After clicking Apply or OK, the pasted entries are automatically sorted in the correct order, based on the depth values.